Showing posts with label Cookies. Show all posts

20 January 2011

The search for the perfect Pineapple Tarts

I've been making pineapple tarts for the last 3 years, each year testing different recipes to see if any is THE ONE I'm looking for. Individual preference can vary much for pineapple tarts. Recently, I found that the phrase "melt in the mouth" can also have different meanings, based on individual expectation. Some use it to refer to cookie crisp, but will disintegrate in your mouth, like Kuih Bangkit. For me, I prefer it to be of a powdery texture such that when you just pop the tart into your mouth, it starts to disintegrate. I hope I have not confused you further...lol...

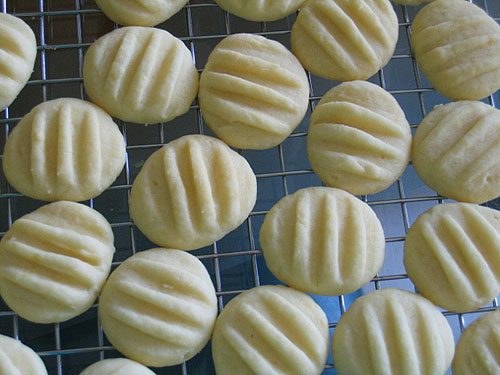
I tried two different recipes this year. The first was from The Little Teochew. I got attracted by her beautiful pictures and the title of her post, "Buttery Melt-in-your-mouth Pastry". It looks like what I may be looking for, since the recipe contains cornflour. I made a mistake by reducing the amount of icing sugar. As such, the pastry tasted quite bland. The recipe uses unsalted butter, which I later find out, does not yield the kind of pastry I like. Because my pineapple jam is tangy, I prefer my pastry to be on the salty side.


Like what Ju mentioned in her post, there are tonnes of recipes out there, what is nice for some may not be others' preference.

So I continued searching and reading up more on pineapple tarts. Someone (I can't recall where I read it from) mentioned that milk powder may yield a more powdery effect. I also learnt that the rubbing-in method which I have been using possibly provides a crisp, melt-in-the-mouth kind of texture. To get a powdery texture, the creaming method (i.e. creaming butter with sugar, like our usual cake) should be used.

Pinkcocoa Tabetai offers a detailed and clear comparison on that.
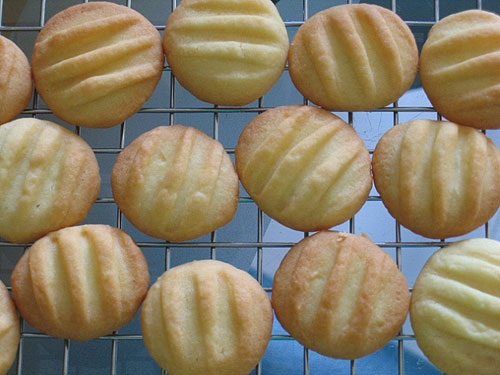
I decided to try her pastry recipe because she seemed to have a good knowledge of pineapple tarts and her recipe has what I was looking for, cornflour and milk powder. I was even happier when I see custard powder as one of the ingredients. I had a big pack of custard powder sitting in my cupboard and was wondering what I can do with it.


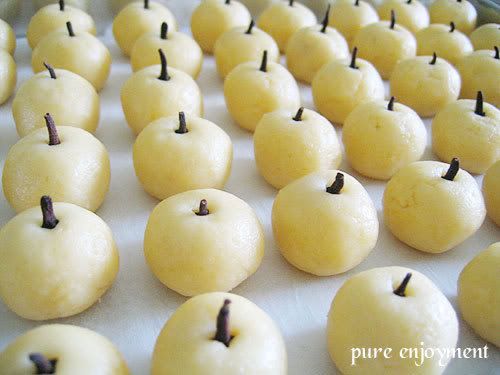
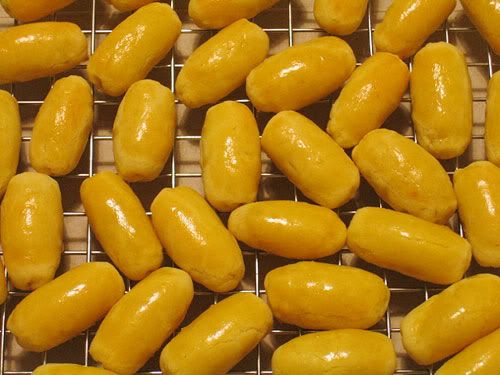
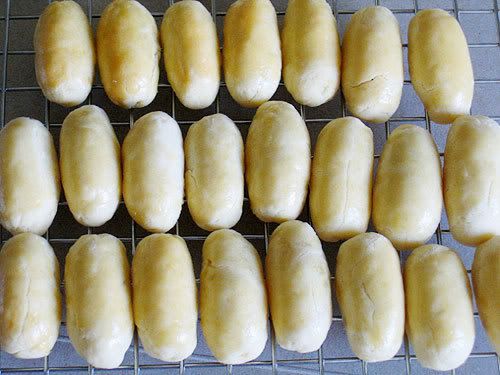
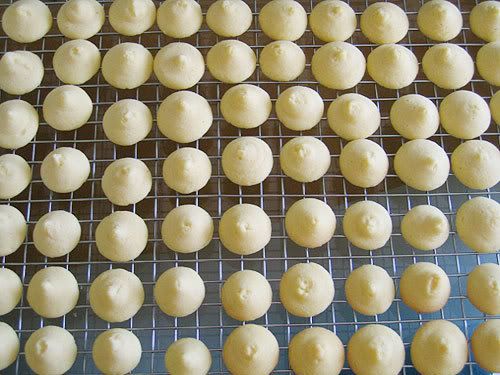
I made a slight change to her recipe though. I replaced the unsalted butter and salt with salted butter. The pastry was super soft and quite difficult to work with. I had to take small portion out of the fridge to work individually. But the result was very encouraging. I tested the tarts straight after they had cooled down. It was powdery and melt-in-the-mouth, as compared to my first attempt. Even hubby said this version was much better. He didn't like the first version of the pastry.


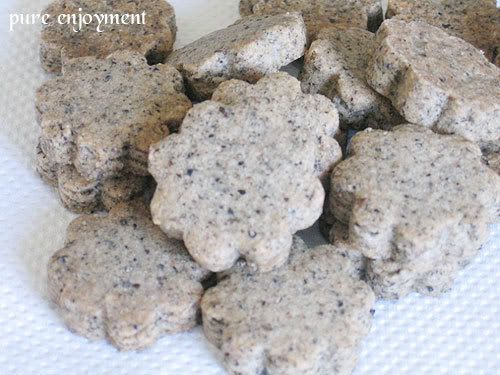
I am so glad that I have finally found the pastry that suits the taste of my family. I will be using this recipe from now onwards. Hope you'll find yours too.

I will be submitting this to the monthly blog event, Aspiring Bakers #3: My Favorite CNY Cookie (Jan 2011). Due to some personal reason, I've missed my submission last month. Hope to make it this round.

31 January 2009

My Chinese New Year bakes

I am way, way behind my blogging. Ever since two weeks before Chinese New Year, I have been baking, almost every other day, but haven't settle down to put them down. Now while I'm waiting for my cake to be done (yes, at this hour of the night), I finally can still some time to do what I've been wanting to do. The PC has not been behaving well (can just hand out of nowhere), hopefully I can complete this blog entry without much interference.

Pineapple Tarts


Pineapple tarts is one of the items adored by lots of people during CNY, including my family. To us, a good pineapple tart must consist of smooth, melt-in-the-mouth pastry and jam that is not too sweet or dry. We also prefer the closed face tarts. Quite a few years back, I bought a big jar of pineapple tarts from Bakery Depot. Those were still the best tarts I've tasted by far. The pastry was so smooth and fine that it almost instantly melt in your mouth. I could not get these tarts anymore and am very much missing them. Since I first embarked on my pineapple tarts journey last year, I've been searching for that perfect recipe. Sad to say, I've yet to find it.


This year, I used Gina's recipe. The pastry has that melt-in-the-mouth texture after a few days, but not as smooth and fine as what I am looking for. I reckon it to be due to my imperfect skills. The recipe uses the rub-in method which I am not experienced in. Nonetheless, they're still good, though they look a bit ugly (some crack after baking). All in all, I've made a few hundreds of tarts this year for relatives and friends. I just have to do something to immerse myself in that festive mood.

My mum does not take butter, she doesn't like the buttery smell (which I adore). So I make another batch using margarine. The dough was much more difficult to handle than the butter dough, it was super soft for a closed tart. But the end product was closer to what I am looking for, the pastry is finer in texture.

Lapis Cake


This year I made a lapis cake as well, but more for our own consumption. The original plan was to make this as part of practice (I've long forgotten what I did last year) and the actual ones nearer to the CNY. But when it got nearer, I got so busy that I just couldn't make another. I used the same recipe as last year. Taste and texture are right, but thickness is far from ideal. Definitely needs more practice.

Other cookies


This year I did two more new cookies. One was the Black Sesame Cookies. I had a pack of ground black sesame lying in my fridge, so I went searching for a recipe. Found one on the net and decided to try it. The result wasn't that fascinating, not my type of cookies as they're quite crunchy. I like cookies that are lighter in texture.

The other one that I tried was the Honey Cornflakes cookies. My new neighbor, Aggie, gave me a box this year and I immediately fell in love with them. Hers were so crispy, even after a few weeks. Don't be tricked, these little cookies don't look as foolproof as what they seem, unless you've got a right recipe. Mine turned out to be a flop. Too much honey, so they lost the crunch very soon and started flooding in their little cups. :( I'll probably try this again one day.

Before I end off, these are what I did in mid-Jan.


The above was a little Peach Marshmellow cake for my niece, Claire's birthday. I couldn't do a very elaborated cake as I was busy with the CNY bakes. I hope she's enjoyed it just as well.

With the remaining ingredients, I did another mini cake. The butterfly is not as prominent after the jelly is in. I had fun creating this little project.

Before...


After...


It's already 2:20am in the morning. I think I should turn in before my panda eyes get worse. Although it's a little late, here's wishing all my cyber friends out there, a very Happy Ox Year! May this year be a peaceful and healthy year for all of us.


Mood: Sleepy

26 March 2008

Mochi Mochi meets Baked Macaroni

I am bored, yes, again. I guess I am one who's easily bored, who cannot stand doing nothing for even a day. I do not have to bake bread today as I still have enough for tomorrow's breakfast.

So I decided to try my hands on mochi, perhaps it's because of the exquisite mochi I've bought recently. Did a search for the recipe of mochi from the net. I realised it's the basic combination of glutinous rice flour (be it local or mochiko), water and sugar. I only have the local glutinous rice flour on hand. I reckon I can always try with mochiko later if I can at least succeed using the local flour. So I went ahead with the experiment. *grin*


Mochi

Yields 15 mochi

Ingredients
1 cup glutinous rice flour or mochiko
*1 cup water (suggest to use 80% of a cup)
1/4 cup sugar

fillings of your choice (I use red bean paste)
cornflour for dusting

Method
1. Stir all ingredients in a heat-proof bowl until smooth. Make sure there isn't any lumps (I used a sieve to sieve through the mixture).
2. Steam in high heat for 30-45 minutes until the mochi is cooked (it should be translucent). Leave to cool.
3. Meanwhile, prepare the fillings. Roll each teaspoon of fillings into a small ball. Leave aside for later use.
4. Pour some cornflour into a deep plate or large bowl for dusting. Make sure your hands, working top and tools are well dusted before you start the wrapping as the dough is very very sticky!
5. Dust a tablespoon with cornflour. Scoop a tablespoon of mochi dough and drop it into the cornflour. Make sure the dough is covered with cornflour so that you can handle with your hands.
6. Gently shake off any excess cornflour and roll out the dough. Do not roll it out too thin as the dough is very soft and will be difficult to wrap.
7. Wrap the fillings in the centre and seal up the opening. Try to shape the mochi into a ball by rolling between your palms (rather difficult, in my honest opinion). Shake off any excess flour (Tip: I throw the mochi lightly into the air and bounce it a few times with my hand).

Note:
* I find 1 cup of water a little too much as the mochi is too soft (though very nice). So the next time I'll reduce the amount of water to see if it's better. I added a few drops of rose pink colour to the water to yield pink mochi.


Ds requested for baked macaroni for dinner. Since I'm too bored to cook rice, I agree and did a simple version. The kids love it so much that they each had an extra serving.


Baked Macaroni

Serve 2 adults and 3 kids

Ingredients

200g macaroni
1 large piece of fish fillet, cut into big chunks
6 Crabsticks
Vegetables of your choice (e.g. brocoli, cauliflower, mix vegetables)
1 egg, beaten
butter

Paste ingredients:
6 tblsp plain flour
2 cups milk
2 cups water
2 tsp salt


Method
1. Season fish fillet with a little salt and pepper for at least half an hour.
2. Boil the macaroni in a large pot of water (with a little salt and oil) till cooked. Set aside.
3. Heat a little butter in a wok and briefly fry the vegetables (need not be fully cooked). Set aside.
4. Mix all paste ingredients together till smooth. Heat a little butter in the wok again. Pour the mixture in and cook to a paste (not too thick).
5. Add the drained macaroni and other ingredients into the paste and mix well.
6. Remove from heat and transfer to a large casserole or baking pan. Sprinkle grated cheese generously on top and baked in preheated oven at 200-220°C for 20 minutes or until the top browned.


Mood: full

30 January 2008

More CNY Baking

I did my last batch of CNY cookies yesterday from morning till almost midnight! Finished 4 tubs of Melting Moments in the morning. Did the Cashiew Nut Cookies from the afternoon through night. I roasted the cashiew nuts myself, so that's a lot of work!


Used the recipe from New Year Cookies, but I modified it by adding 3/4 tsp of salt as I like my Cashiew Nut cookies to be salty.


Ingredients
A
125g butter
70g icing sugar

B
1 egg yolk
1 tsp vanilla essence

C
170g plain flour
*50g cashiew nuts powder (mill cashiew nuts finely)
1 tbsp milk powder
1/8 tsp baking soda
3/4 tsp salt (I added this)

For glazing
**1 egg yolk (beaten)

For decoration
Some cashiew nuts (cut into halves)

Method
1. Beat ingredient A in a mixer until fluffy. Add in ingredient B and mix well before folding in ingredient C. Combine to form a soft dough.
2. Place no.(1) between sheets of plastic. Roll out flat, stamp designs using cookie cutter which has been stained with some flour. Leaves cookies on lined baking tray. Glaze surfaces and imprint a piece of cashiew nut on it. (I reglaze after putting the cashiew nut.)
3. Bake no.(2) in a peheated oven at 180C for 15-20 minutes until golden (I bake at 160-170C for 15 minutes). Remove, cool well before storing in airtight jars.

Note:
* I mill the nuts coarsely as we like the cookies to have bites of cashiew nuts.
** I use 1 egg + 1 yolk for glazing.


Mood: tired

26 January 2008

Pineapple tarts after note

I've waited for a few days to try my pineapple tarts again. Pauline mentioned that the tarts will taste better after a few days when the jam finally "integrate" with the pastry. They do taste better than when I first bake them, but still no "melt-in-the-mouth" feel.

I've used up the remaining pastry and most of the jam in my fridge on Thursday. Made the second batch to bring to my in-laws tomorrow. This time round I bake them a little more golden (since I know they'll probably soften after a few days).


I'm still in search for a real melt-in-the-mouth pastry. I'll probably have to wait till next year as I won't be making any more pineapple tarts this CNY.

Mood: lethargic

22 January 2008

Experimenting with Pineapple Tarts

This year I am daring enough to try the tedious pineapple tarts. Grated and cooked my own pineapple jam some more. Took me a while to get the right texture even for the jam. The first time I did it, it was too wet and light. So I added a little more of the reserved pineapple juice and cooked an additional 1.5 hours. That's a total of about 5 hours to get the "golden" jam. Pauline told me for completely wrapped pineapple tarts, the jam has to be drier than the open faced ones.

Today I baked my first batch of tarts. As with all new recipe I tried, it's more of an experiment rather than baking. I did the dough yesterday night and left it covered in the fridge.

The first batch I only bake 3 tarts (following the suggested temperature and timing), knowing that there's s high chance this batch will not be the perfect one. True enough, the tarts turn out too crunchy, like a cookie. That's not what I was looking for.

The second batch I adjusted my temperature to be lower (around 160-170 degC). This was from my Melting Moments experience. I let the cookies bake for about 10 minutes then brush them with egg wash and bake again. The result is no good. The face of the tarts are totally rough and ugly. No melting effect too. So wrong again.

The last batch was the best, though not perfect yet. I bake them at about 150-160 degC for about 18 mins. This batch I brush them with egg wash at the beginning, before the baking.


The imperfections in this batch are:
- The color is still too light, not golden at all.
- The melt-in-the-mouth effect is not strong enough, though better than the earlier ones.

I am suspecting it could be because I change the sugar to icing sugar. So till now, I have not master the perfect melt-in-the-mouth pineapple tarts yet. I've left half of the dough and jam in the fridge to try again next week. Hopefully I will have some clues soon.

Mood: Deep in thoughts...

15 January 2008

More Melting Moments

After baking the same cookies yesterday and today, I must say I am able to control the baking of the cookies (using my oven) much more successfully than when I first did it last Friday. I have baked a total of 5 tubs of Melting Moments so far and 99%of them turn out well, judging from the colour. I'll bake some more during the week before CNY for some of my close relatives.


Mood: satisfied

11 January 2008

Melting Moments

I tested this recipe from KC this morning for my CNY bake. The recipe yields over 60 cookies, at least.


Made a few mistakes today.
1. I added too much vanilla powder (1 tsp), so the cookies turn out a little bitter.
2. I realise it's not that easy to get this cookie right. If I bake at 180 degC for 15 mins (the specified time), my cookies will be brown, like these. Then they'll lose their melting moments and taste more like normal cookies.


I'll have to adjust my oven temperature to around 150-160 degC and bake them till they're just cooked to get the real melting moments.

Overall I'm satisfied with this recipe and will be doing them again next week for my CNY baking. Hopefully next time round I'll have more correct cookies than this round.

Mood:

14 November 2007

Watermelon cookies

Did some watermelon cookies yesterday. Got the recipe from New Year Cookies. This book covers 66 recipes on different types of cookies, definitely worth a buy!

I made over 140 watermelon cookies yesterday, the largest batch I've made so far. The rest of the dough, I turn them into different shapes using my cookie cutter. I had fun doing these though it's a bit tedious to handle the batch alone. Finally finished all the baking at 11+ pm. *Phew*


Ingredients
A
200g butter
100g icing sugar

B
1 egg
1/2 tsp vanilla essence

C
300g plain flour
100g Hoen Kwe flour (white colour)
1/4 tsp baking powder
1/4 tsp baking soda

D
Dash of red colouring
Dash of green colouring
Some black sesame seeds

Method
1. Beat ingredients A in a mixer until fluffy. Add in ingredient B and mix well. Fold in ingredient C and stir to form a dough.
2. Divide (1) into three equal parts. Leave one part uncoloured, one part coloured green, one part coloured red.
3. Scale each dough to 9g per portion. Shape red portion into rounds, flatten a natural uncoloured portion and wrap around red portion. Next, flatten a green portion and wrapped around uncoloured part. Repeat process with remaining ingredients. Wrap loosely in a plastic bag. Keep chilled till cookies are firm.
4. Slice each ball of cookie into six. Insert some black sesame seeds in to resemble watermelon seeds. Place cookies in paper cups and leave them on lined baking tray. Bake in a preheated oven at 170 degC for 15-20 minutes. Cool well.


Baked the watermelon cookies in 3 batches. The last batch is the best as the cookies are not overbaked and they retained their nice and bright colour.

Had planned for ds to bring some of them to his school teachers, but he said it's weird coz nobody gives presents at this time of the year. So in the end, the cookies went to my 3 little nephew and nieces, the school bus driver and attendant, my mum and in-law, Olina's teachers and also some to Olina's school for their party tomorrow.

Mood: satisfied

27 September 2007

Doggie cookies

I tried baking again today. This time experimenting with some doggie cookies which I saw from another website. Today was my second attempt. Tried the first round using milo instead of holicks 2 days ago. The milo doggies turn out a little dark. And the doggie faces have cracks on them due to the oven having too high a temperature. Gave this batch to my son's classmates as part of his goodies bag.

Milo doggies


This time round I follow the original recipe (see below) and turn the temperature lower. The effects are much better than the first round. I even tried to have different designs for the dogs' ears. will bring this batch to my girl's school tomorrow for Children's Day celebration.

Holicks doggies


For those interested in trying your hands on them, here's the recipe. I used Cake flour instead of top flour and added roughly 15g of castor sugar.

Ingredients:
180g butter
80g Horlicks
100g chocolate chips
200g top flour
25g cornflour
25g milk powder
Koko Krunch

Method:
1) Sift the flour, cornflour and milk powder.
2) Cream the butter and Horlicks for 3 minutes at low speed. Do not overbeat.
3) Add the sifted flour and beat for about one minute to form a dough.
4) Divide dough into 10g each. Embed 3 chocolate chips into each piece of dough and roll into a ball.
5) Insert 2 pieces of Koko Krunch to form the ears and 1 chocolate chip as the nose.
6) Bake at 140 degC for about 25 minutes.
7) Cool before storing.

Mood: accomplished