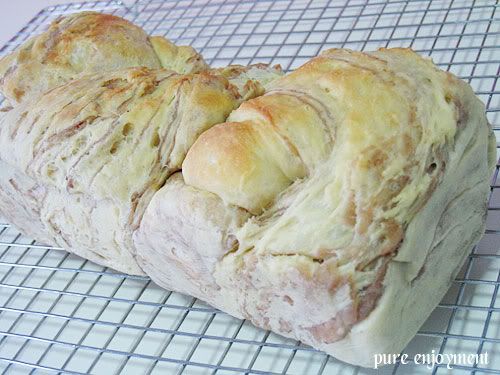
I wasn't very confident when I started out making this bread. There was no ready recipe for me to follow. The closest guide was the Chocolate Swirl Bread which had created some rave way back. But being the experimental me (as usual), I just went ahead with my gut feeling.
I started off making the yam paste yesterday. Given my past experience on the Chocolate Swirl Bread and the Chocolate Wassants, I knew the yam paste has to be as dry as possible.
Then there was the bread to consider. I drafted the ingredients from scratch, did some calculation and went ahead with my experiment. I had a tougher time with the bread as the initial dough turned out too wet. I tried to salvage the situation by adding more flour. After at least an hour of struggling and kneading, I finally had a workable dough to go for first proofing.
I have learnt much about kneading and proofing doughs from the discussions in KC. I was glad I had watched this video prior to handling this dough. It's helped me a lot. I try not to speed up the proofing by my usual hot kettle proofing, in hope to get a more flavourful bread. So I just let the bread proofed in room temperature (which didn't turn out too slow either).
Then comes the wrapping, rolling and shaping. As usual, my skills with wrapping bread has not improved after the Chocolate Wassants. But overall I am happy with today's results. The sweet frqgrant taro swirls make the bread good enough to be eaten on its own.

If you're a yam lover, you'll probably love this bread. If you're willing to give it a try, here's the recipe.
Taro Swirl Bread
Yam Paste
A:
350g Thai Yam (weight excludes skin)
150ml water
B:
80g sugar
C:
50g cake flour
40ml water
Method
1. Cut the yam into big slices. Steam over high heat until cooked (use a chopstick or a fork to test by poking through the yam).
2. Blend the cooked yam with 150ml of water until a fine paste is achieved. (I prefer blending as it gives a smoother consistency than mashing.)
3. Mix the cake flour with the water to a smooth paste.
4. Pour the blended yam into a pot (non-stick preferred). Add the flour mixture and mix well.
5. Cook over medium low heat, adding sugar gradually over 3 times. Keep stirring the mixture to prevent burnt. Reduce the heat when the mixture gets thicker for easier control.
6. After about an hour, the mixture will be very thick. To test if your yam paste is ready, take a big scoop of the paste with a spoon. Invert the spoon and start counting. If it takes about 8-10 secs for the paste to start dropping, the yam paste is ready.
7. Remove from heat and leave to cool.
8. When cooled, put the yam paste into a plastic bag and roll it into a rectangular shape of size 19cm x 17cm (you can adjust the size slightly). You should get about 1cm thickness of yam paste.
Bread Dough
Ingredients
340g bread flour } if you do not have cake flour, you can
40g cake flour } use 380g of bread flour
10g milk powder
5g salt
25g sugar
3g dry yeast
1 medium egg (60g with shell)
25g butter
180g water (suggest to use to 170g first and slowly add in later if dough is too dry)
Method
1. Place all dry ingredients in a large mixing bowl and mix well.
2. Add in the rest of the ingredients (except butter) to form a dough.
3. Rub butter into the dough.
4. Knead the dough till smooth and elastic (I took 1 hr using hand kneading).
5. Round it up into a smooth ball and place it into a well greased bowl to proof till double in size. Cover with a damp towel.
6. When proofing is completed, gently remove dough and roll it out into a 39cm x 35cm rectangle. (Note: If you change the size of the yam paste rectangle above, just roll your dough to slightly more than double the length and width of the yam paste.)
7. Place the yam paste in the center of the rectangular dough.

8. Fold all sides of the dough to cover the yam paste. Seal all edges tightly. I place the four corners diagonally to better seal up the openings.


9. Roll out the dough to about 25cm x 35cm.
10. Make 3 folds (as shown in pictures below).


11. Repeat steps 9 & 10 one more time. Rest for 10 minutes.
12. Finally, roll the dough lengthwise (i.e. along the longer side) to slightly longer than the length or your bread tin or loaf pan, keeping the shorter end intact. Make a cut in the middle leaving about 3cm on top.

13. Twist and plait the dough.

14. Place the dough into your bread tin or loaf pan and let it rise in room temperature to about double in size (mine took about an hr).


15. Bake in preheated oven at 180°C for 30-35 minutes.
After Note:
You can use any existing plain/white loaf recipe you have for the bread.
The yam paste gets more sticky the next day due to the nature of the yam. So it's best to leave unconsumed bread in the fridge and finish it within 1-2 days.
Mood:
 tired
tired

14 comments:
Congratulations on a successful bread again!
On the side note, I was reading this lady's blog on bread baking, who later opened a bakery, she started out making the same recipe more than 100 times, she said that she had to practise till it came perfect. I thought to myself *Wow, 100 times* .... but guess what WF, she later had her own bakery. Amazing isn't it.
So back to you, I am so proud of you for your baking skills, for your sharing of recipes, for your step by step photos, you are an amazing gal.
Take care,
Sandra
wow wf, thanks for this taro bread recipe and photo. it's something that I would try definitely. love taro but usually no time to try and this weekend busy. maybe next week...
Hi,
You're really good at making bread :)
I love yams and this one looks good!
Thanks Sandra for that very inspiring story, though I don't think I'm going to have my own bakery...lol...
Yuri, this bread is a little tricky to handle. Maybe you try it with your bread machine and let me know if it turns out ok, coz I did this on a bit of "agaration" (i.e. estimation).
ting, thanks for dropping by. I'm not that good yet (you haven't seen my failed breads), but I love to experiment. :)
Hi
I really admire you for keep trying. Do you think will this bread work well with Tang zhong.
Keep it up!
Seline
WF, thanks for sharing. I love Or Nee, am a 100% Teochew~! :)
Seline, it probably would. I had wanted to try with TZ, but was too lazy to make a new batch and wait for it to cool. If you have an existing TZ white loaf, you can use that recipe too. Just do the yam paste and the shaping. Do note that the yam paste is quite sticky on the next day due to the nature of the yam. So try to consume the bread within 1-2 days. Best to leave any remaining in the fridge.
Rei, I'm half teochew only, but love yam paste, nonetheless! :)
Hi Kwf
Thank you for your quick response, greatly appreciated it, I will try out this weekend.
Thanks again
Seline
Hi
I came across a book by Judy Koh that she made taro's bread too but her is with fresh fruits as topping. Maybe you can check that out as well.
meow meow, can you let me know the name of the book please? Where did you find that?
Hi kwf
The book title is called RECIPE FROM THE HEARTS by judy koh. There's a mixture of recipes inside beside bread. Think bread recipes got abt 5 kinds. If you are just interested in the taro bread recipes, prehaps i will take down the recipe for you when i visit my gf this week.
Thanks meow meow! Would love to see how Judy does it. I'll probably try to get hold of that book too to see what else are in there.
No problem. :) between crystal jade @ T3is selling this taro bread as well. Can even see the taro paste on them. Seem yummy.
wow...T3 seems very far away...hahaha... If I happen to be there or pass by any Crystal Jade, I must remember to go check it out. Thanks for the info.
Post a Comment